Microsoft has made it much harder to get rid of the lock screen after the Anniversary Update. Here are your options.
Windows 10 is a universal operating system, which means it's designed for both touchscreens and non-touchscreens. But the lock screen which we first saw in Windows 8 -- is pretty much only designed for touchscreens.
If you have a non-touchscreen PC running Windows 10, the lock screen is, at best, redundant. It's not even the log-in screen -- it's a screen that needs to be tapped away before you get to the log-in screen. I'm not sure why Microsoft hasn't made turning off the lock screen a quick and easy settings tweak, but they haven't.
In fact, after the Windows 10 Anniversary Update, Microsoft has doubled down on the lock screen -- a registry hack that previously worked to disable the lock screen no longer works, and the Group Policy Editor in Pro versions of Windows 10 also no longer allows you to get rid of the lock screen.
In other words, the lock screen is here to stay...forever.
Windows 10 actually has two lock screens. Well, they're the same lock screen, but they run in two separate instances: The first runs when you turn on your computer, and the second runs when you unlock your computer from an already-turned-on state, such as sleep or manual lock ( Start > Account >Lock). At this moment, we haven't figured out how to turn off the first lock screen. But you can turn off the second lock screen, which means you will not see the lock screen when it awakes from sleep or when you unlock it from a manual lock you'll go straight to the login screen.

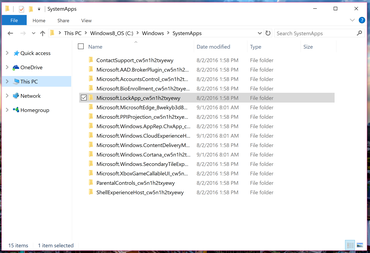
There are a few different ways to do this, but the easiest way I found was to just disable the LockApp folder, which is essentially the lock screen 'app' on your hard drive. To do this, open File Explorer and go to C > Windows >SystemApps and locate the Microsoft.LockApp_cw5n1h2txyewy folder.
Right-click this folder and click Rename . Do not change the name of the folder, but simply add .bak to the end of it and hit enter.

You may need to provide administrator permission to rename the folder. If you see a UAC pop-up, hit Continue to continue.
You can now lock your computer or put it to sleep, and when you unlock or wake it up, you will no longer see the lock screen. You will either see the log-in screen or the desktop, depending on what your login settings are. If you would like to get your lock screen back, simply go back to the folder and remove the .bak from its name.
Again: This will not disable the bootup lock screen; if you shut down your computer, you will still see the lock screen when it first boots up.
The following registry hack no longer works after the Windows 10 Anniversary Update.

1. Right-click the Start button and select Run from the pop-up menu. In the Run dialog box, type regedit and click OK . You may encounter a User Account Control (UAC) pop-up window asking you if you want to allow this program to make changes to your computer. Click Yes to proceed.
2. The Registry Editor will open. In this window, navigate to HKEY_LOCAL_MACHINE\SOFTWARE\Policies\Microsoft\Windows

3. In the Windows folder, right-click in the right pane of the Registry Editor, select New and then select Key. This will appear as a folder in the Windows folder, titled New Key #1 . Rename it Personalization and select the folder by clicking it

4. In the Personalization folder, right-click in the right pane of the Registry Editor, select New and then select DWORD (32-bit) Value . You will see a new item pop-up in the right pane of the Registry Editor, titled New Value #1 . Rename this to NoLockScreen.

5. Double-click NoLockScreen to open its value data. Under Value data: change the value from 0 to 1 and click OK . Exit out of the Registry Editor and reboot your PC you will no longer see the lock screen (though you will still see the log-in screen, where you'll need to enter your password to log in to your PC unless you disable the log-in screen using this tutorial ).


0 comments:
Post a Comment